This post will show how to create a Jersey2 REST Client in a Spring environment and test the same using JUnit and JMock frameworks. The details of the actual application are explained in the earlier post given by the link Building Java Web Application Using Jersey REST With Spring.
1. Update pom.xml
To make the Maven Java Web Application project (Building Java Web Application Using Jersey REST With Spring) support the JUnit testing framework, add the following dependency to the existing pom.xml
1 2 3 4 5 | |
2. Create packages for Client tier classes
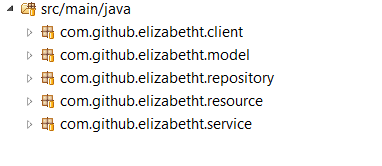
Create package for the Jersey Client classes under the src/main/java folder.
A sample snapshot of the project after the package creation is as shown below:

3. Create classes for Client tier
Create an interface class named StudentClientInterface.java inside the package com.github.elizabetht.client to support the client operations.
1 2 3 4 5 6 7 8 9 10 11 12 13 | |
Create a client tier implementation class (a POJO indeed) named StudentClient.java inside the package com.github.elizabetht.client. This is where the client logic goes – either to access the GET/POST methods in the StudentResource.java class.
1 2 3 4 5 6 7 8 9 10 11 12 13 14 15 16 17 18 19 20 21 22 23 24 25 26 27 28 29 30 31 32 33 34 35 36 37 38 39 40 41 42 43 44 45 46 47 48 49 50 51 52 53 54 55 | |
4. Create packages for Client Test tier classes
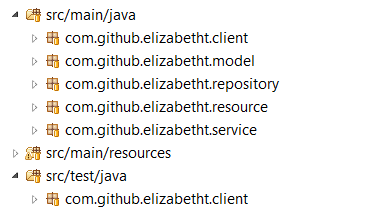
Create package for the Client Test classes by right-clicking on the StudentClient.java class and choosing “New->JUnit Test Case” option. Specify the source folder as StudentEnrollmentWithREST/src/test/java folder (create the src/test/java folder if the folder does not exist) and specify the name for the test class.
A sample snapshot of the project after the package creation is as shown below:

5. Extract Interfaces for Model and Resource tier classes
In order to support the use of JMock mocking framework alongside JUnit test cases, extract the interfaces out of the Model(Student.java) and Resource (StudentResource.java) tier classes. This is necessary in order to mock the objects.
Extracting interfaces can be done by right-clicking on the class file and choosing “Refactor->Extract Interface” option.
The StudentInterface.java (in src/main/java/com.github.elizabetht.model package) after the extraction looks as below.
1 2 3 4 5 6 7 8 9 10 11 12 13 14 15 16 17 18 19 20 21 22 23 24 25 26 27 28 29 30 31 | |
Similarly, the StudentResourceInterface.java (in src/main/java/com.github.elizabetht.resource package) looks as below.
1 2 3 4 5 6 7 8 9 10 11 12 13 | |
6. Create Unit Test cases for StudentClient class
As a part of unit testing, each of the unit must be testable individually. While in reality, each unit would depend on other modules. This is where JMock comes into picture – to help to test a unit individually by mocking the dependencies.
@Before annotation helps to define the environment that needs to be setup before running each test case. In this example, the context and mock objects are setup using the @Before annotation.
1 2 3 4 5 6 7 8 9 10 11 12 13 14 15 16 17 18 19 20 21 22 23 24 25 26 27 28 29 30 31 32 33 34 35 36 37 38 39 40 41 42 43 44 45 46 47 48 49 50 51 52 53 54 55 56 57 58 59 60 61 62 63 64 65 66 67 68 69 70 71 72 73 74 75 76 77 78 79 80 81 82 83 84 85 86 87 88 89 90 91 92 93 94 95 96 97 98 99 100 101 102 103 104 105 106 107 108 109 110 111 112 113 114 115 116 117 118 119 120 121 122 123 124 125 126 127 128 129 130 131 132 133 134 135 136 137 138 139 140 141 142 143 144 145 146 147 148 149 150 151 152 153 154 155 156 157 158 159 160 161 162 163 164 165 166 167 168 169 170 171 172 173 174 175 176 177 178 179 180 181 182 183 184 185 186 187 188 189 190 191 192 193 194 195 196 197 198 199 200 201 202 203 204 205 206 207 208 209 210 211 212 213 214 215 216 217 218 219 220 221 222 223 224 225 226 227 228 229 230 231 232 233 234 235 236 237 238 239 240 241 242 | |
7. Create Unit Test cases for StudentResource class
In similar lines, create unit test cases for StudentResource class by mocking the external dependencies which the class depends on for its operation.
1 2 3 4 5 6 7 8 9 10 11 12 13 14 15 16 17 18 19 20 21 22 23 24 25 26 27 28 29 30 31 32 33 34 35 36 37 38 39 40 41 42 43 44 45 46 47 48 49 50 51 52 53 54 55 56 57 58 59 60 61 62 63 64 65 66 67 68 69 70 71 72 73 74 75 76 77 78 79 80 81 82 83 84 85 86 87 88 89 90 91 92 93 94 95 96 97 98 99 100 101 102 103 104 105 106 107 108 109 110 111 112 113 114 115 116 117 118 119 120 121 122 123 124 125 126 127 128 129 130 131 132 133 134 135 136 137 138 139 140 141 142 143 144 145 146 147 148 149 150 151 152 153 154 155 156 157 158 159 160 161 162 163 164 165 166 167 168 169 170 171 172 173 174 175 176 177 178 179 180 181 182 183 184 185 186 187 188 189 190 191 192 193 194 195 196 197 198 199 200 201 202 203 204 205 206 207 208 209 210 211 212 213 214 215 216 217 218 219 220 221 222 223 224 225 226 227 228 229 230 231 232 233 234 235 236 237 238 239 240 241 242 243 244 245 246 247 248 249 250 251 252 253 254 255 256 257 258 259 260 261 262 263 264 265 266 267 268 269 270 271 272 273 274 275 276 277 278 279 280 281 | |
8. Create Unit Test cases for StudentService class
Create unit test cases for StudentService class by mocking the external dependencies which the class depends on for its operation.
1 2 3 4 5 6 7 8 9 10 11 12 13 14 15 16 17 18 19 20 21 22 23 24 25 26 27 28 29 30 31 32 33 34 35 36 37 38 39 40 41 42 43 44 45 46 47 48 49 50 51 52 53 54 55 56 57 58 59 60 61 62 63 64 65 66 67 68 69 70 71 72 73 74 75 76 77 78 79 80 81 82 83 84 85 86 87 88 89 90 91 92 93 94 95 96 97 98 99 100 101 102 103 104 105 106 107 108 109 110 111 112 113 114 115 116 117 118 119 120 121 122 123 124 125 126 127 128 129 130 131 132 133 134 135 136 137 138 139 140 141 142 143 144 145 146 147 148 149 150 151 152 153 154 155 156 157 158 159 160 161 162 163 164 165 166 167 168 169 170 171 172 173 174 175 176 177 178 179 | |
9. Running Test cases
Any of the test case or test class can be run by right clicking on the name of the test case or test class and choosing “Run As->JUnit test case”. Each of the test case developed should be tested to give a success output (indicated by the green bar in the JUnit output)
10. Code Coverage
Using tools like EclEmma, code coverage for the project can be measured. To install EclEmma, choose “Help->Eclipse Marketplace” and search for EclEmma in the search toolbar. Install the tool using the steps on-screen.
Once the tool is installed, the code coverage for the project can be measured by choosing “Coverage As->JUnit test case” from the right click options on the project.
Achieving a code coverage of about or above 80% is normally preferred according to industrial standards. Not only writing unit test cases for existing code, but developing test scenarios for which code is not in place is an important step in Test Driven Development (TDD). By iteratively following the TDD approach, the stability of the code could be significantly improved.
11. Clone or Download code
If using git, clone a copy of this project here: https://github.com/elizabetht/StudentEnrollmentWithREST.git
In case of not using git, download the project as ZIP or tar.gz file here: https://github.com/elizabetht/StudentEnrollmentWithREST/releases/tag/1.2